一、初始化
创建一个用来测试的目录,然后安装 puppeteer 依赖项1
2
3
4mkdir puppeteer-auto-fill
cd puppeteer-auto-fill
npm init
npm i puppeteer
创建一个 index.js 文件用来编写测试脚本。往package.json中添加scripts:1
2
3
4"scripts": {
"start": "node index.js",
"debug": "env DEBUG=\"puppeteer:*\" node --inspect-brk index.js"
},
Chrome DevTool 调试方式:
- 打开 Chrome,输入 chrome://inspect/#devices
- 运行
debug脚本后,可以看到调试页面,点击inpect进入断点调试

二、代填逻辑
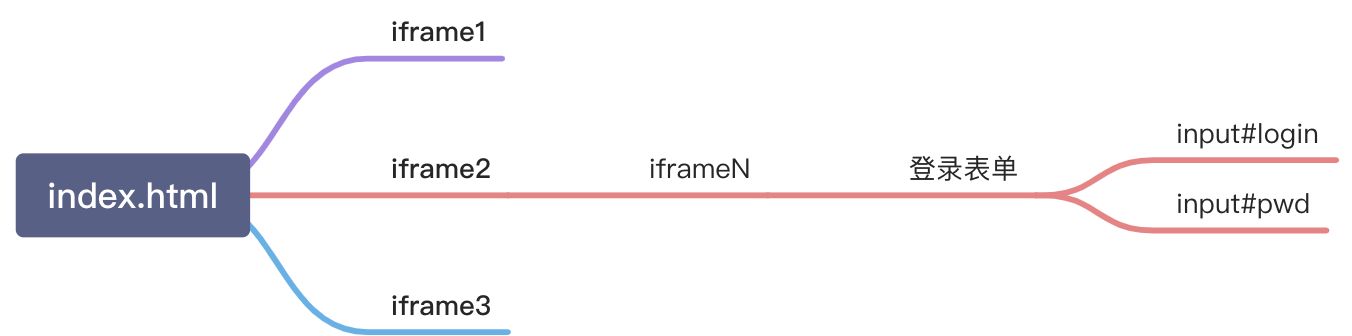
1. 模拟多 iframe 嵌套场景
iframe嵌套关系如下:
2. 代填脚本
- 启动参数说明:
headless: false 是否在后台进行devtools: true 打开页面后是否显示开发者工具slowMo: 0 操作延时,把这个数字可以调大相当于慢放
Frame查找:
通过Frame.$(.selector)的方式查找返回选择器条件的 iframe,如果找不到会返回null,否则会返回一个ElementHandle对象,然后在通过.contentFrame()将其转换为Frame对象。Page和Frame都有.waitForSelector()方式用于等待元素加载完成。- 通过
.waitForTimeout()方法来实现延时输入效果。
完整代码如下:1
2
3
4
5
6
7
8
9
10
11
12
13
14
15
16
17
18
19
20
21
22
23
24
25
26
27
28
29
30
31
32
33
34
35
36
37
38
39
40
41
42
43
44
45
46
47
48
49
50
51
52
53
54
55
56
57
58
59
60
61
62
63
64
65
66
67
68
69
70
71
72
73
74
75
76
77
78
79
80
81
82
83
84
85
86
87
88
89
90
91
92
93
94const puppeteer = require('puppeteer');
(async () => {
const browser = await puppeteer.launch({ headless: false, devtools: true, slowMo: 0 });
const page = await browser.newPage();
await page.goto('http://localhost/frameset/index.html');
tryFillForm(page, [
{ type: 'iframe', selector: '#app > iframe:nth-child(3)' },
{ type: 'iframe', selector: 'body > iframe' },
{ type: 'text', selector: '#login', value: 'admin' },
{ type: 'password', selector: '#pwd', value: '12345678' },
]);
})();
let tryFillForm = async function(page, autoFillInfo) {
try {
await page.evaluateOnNewDocument(() => {
Object.defineProperty(navigator, 'webdriver', {
get: () => false,
});
});
let waitEntry = page;
let frameDeep = 0;
for(let i = 0; i < autoFillInfo.length; i++) {
let info = autoFillInfo[i];
if('iframe' === info.type) {
await waitEntry.waitForSelector(info.selector, {timeout : 5000});
let iframe = null;
if(frameDeep === 0) {
iframe = await waitEntry.mainFrame().$(info.selector);
} else {
iframe = await waitEntry.$(info.selector);
}
//frames.forEach(f=>console.log(f.name()));
if (iframe) {
//console.log(iframe.url());
waitEntry = await iframe.contentFrame();
}
// break;
frameDeep++;
}
}
for(let i = 0; i < autoFillInfo.length; i++) {
let info = autoFillInfo[i];
if('iframe' !== info.type) {
await waitEntry.waitForSelector(info.selector, {timeout : 120000});
}
}
for(let i = 0; i < autoFillInfo.length; i++) {
let info = autoFillInfo[i];
let type = info.type;
if('iframe' !== type) {
if(!type) {
type = await waitEntry.evaluate((selector) => {
let element = document.querySelector(selector);
if(element) {
let nodeName = element.nodeName.toLowerCase();
let type = nodeName;
if(nodeName === 'input') {
type = element.type || 'text';
}
if(type === 'submit') {
type = 'button';
}
return type;
}
return null;
}, info.selector);
}
if(type) {
console.log(info);
if(type === 'text' || type === 'password') {//填充节点
//有些节点必须通过type来改变值,有些节点只能直接改变value,所以两个都做,先type然后再改值
await waitEntry.type(info.selector, info.value);
await waitEntry.evaluate((data) => {
return document.querySelector(data.selector).value = data.value
}, info);
// 等待 0.5s
await waitEntry.waitForTimeout(500);
} else if(type == 'select') {//combbox
await waitEntry.select(info.selector, info.value);
} else if(type == 'button') {
waitEntry.click(info.selector, {delay : 1000});
} else {
waitEntry.click(info.selector);
}
}
}
}
} catch(e) {
console.error(e);
}
};
